
Linux is a free, open-source operating system that manages a computer’s hardware and lets you run applications—similar in purpose to Windows or macOS. Linux is the software layer that: Provides a user interface (graphical or command-line), Controls your CPU, memory, disk, and devices and Lets you run programs.
Distributions (distros)
Linux comes in many versions called distributions, which bundle the Linux kernel with tools and software. Examples include:
- Ubuntu
- Fedora
- Debian
- Arch Linux
Each distro targets different users—beginners, developers, servers, or power users.
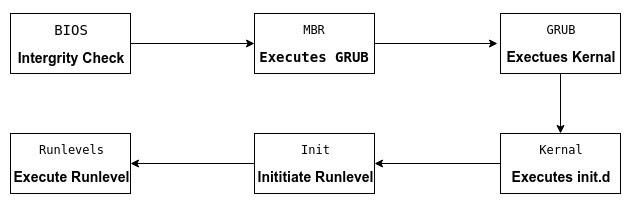
Linux Booting Process
Systemd is a system that is designed specifically for the Linux kernel. It replaces the sysvinit process to become the first process with PID = 1, which gets executed in user space during the Linux start-up process.
Below is the list of some useful systemd utilities along with a brief description of what they do:
- systemctl: It Controls the systemd system and services.
- journalctl: Used To manage journal, systemd’s own logging system
- hostnamectl: Can Control hostname.
- localectl: Helps Configure system local and keyboard layout.
- timedatectl: Used to Set time and date.
- systemd-cgls : It Shows cgroup contents.
- systemadm: It is a Front-end for systemctl command.
Process Management
# List all services
systemctl list-unit-files

# Check status of a service
systemctl status service_name

# Stop a service
systemctl stop service_name

# Prevent a service from starting at bot
systemctl disable service_name

# Start a service
systemctl start service_name

# Enable a service after boot
systemctl enable service_nameAll the configuration files of systemd services will :
- /lib/systemd/system/
- /usr/lib/systemd/system
Disk Management
Show block devices in a tree format, useful to see:
- Disks (sda, nvme01)
- Partitions (sda1, sda2)
- Mount points
# List block devices
lsblkCheck used and available disk space
# Check used and available disk space
df -h

# Show disk usage of directories/files
du -sh /var/log
# List all disk and their partitions
fdisk -l
# Perform actions on particular disk
fdisk /dev/sda
Common actions:
n→ new partitiond→ delete partitionp→ print tablew→ write changes
Formatting the partitions
# Once the partition is created, we create the file format
mkdir.ext4 /dev/sda1

# Other file formats are
mkdir.ntfs <partition-name>
mkdir.vfat <partition-name>
mkdir.xfs <partition-name>Mounting and unmounting disks
mount /dev/sda1 /mnt/dir1

umount /mnt/dir1

# if unable to umount as it is busy, you can look for open files using the below command:
lsof /mnt/dir1Check for bad blocks
badblocks -sv RAID Management
RAID (Redundant Array of Independent Disks) combines multiple disks to improve performance, fault tolerance, or both.
Common RAID Levels
| RAID | Purpose | Minimum Disks |
|---|---|---|
| RAID 0 | Performance (striping, no redundancy) | 2 |
| RAID 1 | Mirroring (redundancy) | 2 |
| RAID 5 | Performance + parity | 3 |
| RAID 6 | Double parity | 4 |
| RAID 10 | Performance + redundancy | 4 |
Prerequisites
- Linux system with multiple disks (e.g.
/dev/sdb,/dev/sdc) - Root or sudo access
mdadminstalled
RAID Creation
# List Block devices
lsblk

# Wipe existing signatures
wipefs -a /dev/sdb
wifefs -a /dev/sdc

# Create RAID array
mdadm --create /dev/md0 \
      --level=1 \
      --raid-devices=2 \
      /dev/sdb /dev/sdc

# Create a filesystem
mkdir.ext4 /dev/md0

# Mount RAID array
mount /dev/md0 /mnt/raid

# Verify
df -h

# Persist RAID configuration
mdadm --detail --scan | sudo tee -a /etc/mdadm/mdadm.conf
update-initramfs -u

# Persist mount
blkid /dev/md0

# Add the output to /etc/fstabRAID updation
# Check status
mdadm --detail /dev/md0

# Stop RAID
mdadm --stop /dev/md0

# Replace failed disk
mdadm /dev/md0 --fail /dev/sdb
mdadm /dev/md0 --remove /dev/sdb
mdadm /dev/md0 --add /dev/sdb
User Management
Basic commands
# Create users

## Low level, script friendly
useradd
## High-level (Debian/Ubuntu)
adduser
# Modify user
usermod
usermod -aG user group  # Append user to group
# Delete user
userdel

# Password & Authentication
passwd         # Set/change password
chage          # Password aging & expiry
faillog        # Login failure records
lastlog        # Last login per user

# User identity and session info
id             # UID, GID, groups
whoami         # Current user
who            # Logged-in users
w              # Logged-in users + activity
users          # Logged-in usernames only
logname        # Original login user

# Audit and Login history
last           # Login history
lastb          # Failed logins (root only)
uptimeGroup management
# Add new group
groupadd
# Modify group name or GID
groupmod
# Delete existing group
groupdel
# Administer /etc/group and /etc/gshadow
gpasswd
gpasswd -a username groupname     # Add user to group
gpasswd -d username groupname     # Delete user from group
gpasswd -A username groupname # Delegates group management rights to the userCore Identity and Membership Files
/etc/passwd: Stores basic user account details like the username, User ID (UID), primary Group ID (GID), home directory path, and default login shell. It is publicly readable by all users./etc/group: Defines all local groups and lists their members. Each entry includes the group name, GID, and a comma-separated list of secondary users./etc/shadow: Stores encrypted (hashed) user passwords and password expiration/aging policies. For security, it is only readable by the root user./etc/gshadow: A secure version of the group file containing encrypted group passwords and a list of group administrators.
PAM (Pluggable Authentication Module)
PAM is a rule engine that decides whether a user action is allowed. Every time someone:
- logs in (
ssh, console, GUI) - runs
sudo - switches user (
su) - unlocks a screen
The application asks PAM -> PAM evaluates rules -> Access is allowed or denied
PAM is built from four stacks, evaluated top to bottom.
| Stack | Purpose | Example |
|---|---|---|
auth | Who are you? | Password, MFA |
account | Are you allowed now? | Expiry, lock |
password | Change credentials | Password rules |
session | What happens after login | Limits, env |
PAM Configuration location
/etc/pam.d/
├── sshd
├── login
├── sudo
├── su
├── common-auth
├── common-account
├── common-session
└── common-password
PAM rule syntax:
<stack>  <control>  <module>   [options]
auth   [required | requisite | sufficient | optional ]  pam_unix.so
Essential PAM modules are:
| Module | What it does |
|---|---|
pam_unix.so | Local Linux users |
pam_sss.so | LDAP / Active Directory |
pam_faillock.so | Lock after failures |
pam_nologin.so | Maintenance lock |
pam_access.so | Allow/deny users |
pam_time.so | Time-based login |
pam_limits.so | Resource limits |
pam_env.so | Set environment |
Network Management
Linux networking has three layers you manage:
- Link layer – network interfaces (Ethernet, Wi-Fi)
- IP layer – addresses, routes, DNS
- Connection layer – NetworkManager / Wi-Fi authentication
# List interfaces
ip link

# Show IP addresses
ip addr

# Filter one interface
ip addr show eth0

# Bring interfaces up/down
ip link set eth0 up
ip link set eth0 down

# Wifi
ip link set wlan0 up

# Assign IP Temporarily
ip addr add 192.168.1.50/24 dev eth0

# Remove IP
ip addr del 192.168.1.50/25 dev eth0

# Routing
ip route

# Add default gateway
ip route add default via 192.168.1.1

# Delete route
ip route del defaultDNS Configuration
# View DNS
resolvectl status
# Temporarily set DNS
resolvectl dns eth0 8.8.8.8  1.1.1.1
# Test connectivity
ping google.com
# Trace route
traceroute google.com
# Check open ports
ss -tulnFirewall Management
In Debian based distributions, firewall management is usually done with UFW (Uncomplicated Firewall). It’s basically a friendly wrapper around iptables, and it covers ~95% of common needs without pain. Let’s walk through it cleanly.
# Check the status
ufw status
ufw status verbose

# Install ufw if not installed
apt update
apt install ufw

# Enabling defaults
ufw default deny incoming
ufw default allow outgoing

# Allow by service name
ufw allow ssh
ufw allow http
ufw allow https

# Allow by port
ufw allow 80
ufw allow 8080/tcp
ufw allow 53/udp

# Allow from specific IPs
ufw allow from 192.168.1.100
ufw allow from 192.168.1.100 to any port 22

# Allow a subnet
ufw allow from 192.168.1.0/24

# List firewall rules
ufw status numbered

# Delete rule
ufw delete 2

# Reload firewall
ufw reload

# Reset everything (wipes all rules)
ufw reset

# Enable logging
ufw logging on
tail -f /var/log/ufw.logCustom rules are stored at :
- /etc/ufw/before.rules
- /etc/ufw/after.rules
There is also a GUI option that can be install with package gufw
Device Management
// Coming up soon
Linux Hypervisor
LXC (Linux Containers)
LXC (Linux Containers) and Docker are both containerization technologies but differ in their fundamental approach and intended use cases: LXC is for OS-level (system) virtualization, behaving like a lightweight virtual machine, while Docker is for application-level (process) virtualization, focused on packaging and deploying single applications.
Key Architectural Differences
| Feature | LXC (Linux Containers) | Docker |
|---|---|---|
| Focus | Whole operating system environments | Single applications and their dependencies |
| Isolation | OS-level isolation, similar to a VM, can have a separate kernel | Process-level isolation, all containers share the host kernel |
| Management | Managed like a standard Linux server, uses lxc command line tool | Uses an extensive ecosystem of tools (docker build, docker run, Docker Hub, Docker Compose) |
| Networking | Containers can have their own dedicated IP address and behave like a separate host on the network | Uses NAT and port forwarding by default, with an internal bridge network for communication, but flexible networking options are available |
| Persistence | Persistent filesystem by default, managed like a standard OS filesystem | Uses a layered, ephemeral filesystem (Copy-on-Write) with data loss on container deletion unless persistent volumes are configured |
CGroups
Cgroups is a Linux kernel feature that limits, accounts for, isolates the resource usage of a collection of processes.